Inverse square law
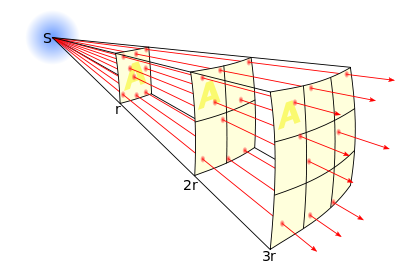
"In physics, an inverse-square law is any physical law stating that a specified physical quantity or intensity is inversely proportional to the square of thedistance from the source of that physical quantity. In equation form:The divergence of a vector field which is the resultant of radial inverse-square law fields with respect to one or more sources is everywhere proportional to the strength of the local sources, and hence zero outside sources. Newton's law of universal gravitation follows an inverse-square law, as do the effects ofelectric, magnetic, light, sound, and radiation phenomena."
Guide numbers
"The guide number is the product of the maximum flash-to-subject distance and the f-number of the aperture that will correctly expose film or a digital sensor with the specified sensitivity.
GN = distance × f-number" The higher the guide number, the more powerful the flash.
GN = distance × f-number" The higher the guide number, the more powerful the flash.
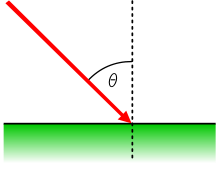
"Angle of incidence is a measure of deviation of something from "straight on", for example:
- in the approach of a ray to a surface, or
- the angle at which the wing or horizontal tail of an airplane is installed on the fuselage, measured relative to the axis of the fuselage."
no fill
No fill (open shade)
White Fill (open shade)
Black Fill (open shade)
Gold Fill (open shade)
Silver Fill (open shade)
Black Fill
Sketch notes

White Fill
Silver Fill
Diffusion
Gold Fill
No Fill
Jpeg vs. Raw comparison
Both jpeg files and raw files had pros and cons. One pro of the raw is it was easier to restore the photo when it was under or over-exposed. It also had an easier editing program. However each file took up a lot of space on the computer. Jpeg's are a lot smaller and easier to open. You don't have to open Photoshop to view them and they are more efficient for posting on the interweb. A downside of the jpeg is that they were really hard to edit in Photoshop. Adjusting the brightness and lighting and saturation improved the photos but not by much, so raw files are better in that area. Even though they were harder to edit, I like jpeg files better because they're easy to transport and look at and they're smaller. And when you take the picture under or over-exposed, they come out much better than raw and the color/lighting/sharpness is more detailed.
JPEG
RAW

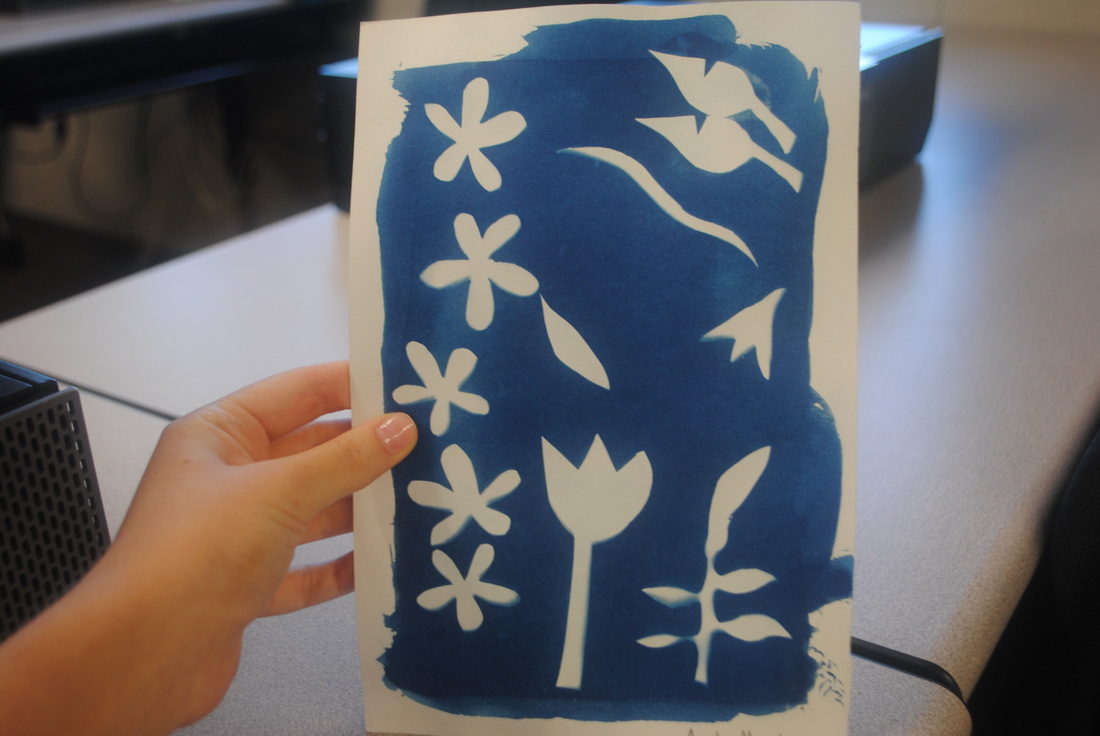
Cyanotype
Photography techniques
Lines

In this picture I used the compositional technique of lines. The horizon creates a horizontal line and the waves make curved and horizontal lines.
Point of view (final)

I used the camera technique, point of view, in this picture. It shows point of view because you are looking up at the subject. By the way the camera is directed, you can tell that you are not level with the subject being photographed and it is taller than you.
Shallow depth of field (final)

In this picture I used the a shallow depth of field. The flower is close up to the camera and in focus; the background is blurred. With the flower up close and in focus, it draws in attention and is the general subject of the photo.
Reflection (final)

The compositional technique I used in this photo is reflection. The pool reflected the palm trees and sky, creating this scene.
Stop action (final)

Using many images, I made an animation using the camera technique, stop action. By only changing small parts of the picture and taking a picture each time something was changed, I made it look like the subject was moving.
Pattern (final)

In this picture I made a pattern with the shells. The shells are lined up next to each other and create the shape of a flower.
Simplicity (final)

The compositional technique I used in this photo was simplicity. I contrasted my pale hand against the plain dark red wall. By doing this I brought attention to my hand, and the words contrasted with my simple hand therefor bringing attention to the word.
Shadow (final)

The compositional technique I used in this picture is shadow. By facing away from the sun I was able to make a long shadow and take a picture of it.
Blurring (final)

The technique I used in this photo was blurring. By blurring this photo, I showed motion. I took this photo by driving by the sign in a car and capturing it quickly.
Framing (final)

The technique I used in this photo was framing. By using the sides of a table to create a frame within the picture, I brought attention to the blacktop, field, and trees. This creates a feeling of mystery or curiosity.
Silhouette (final)

In this photo I took a silhouette. I achieved this by waiting until sunset and taking the picture facing the sun. When I pointed the camera towards the sun, the subject I was photographing contrasted and came out black.
Music video final- Clairvoyant by The Story So Far
Rim light
Open shadow
Back lit
Surrealism tutorial
Surrealism tutorial
Side-lighting
Dr. Seuss Illustration (1/3)
When I read the Dr. Seuss quote, I thought about being imaginative and having a unique mind. In this photo, I show a crowded ocean scene in the silhouette of a person. It shows how there can be an entire growing world inside someone. Constantly changing and moving, everyone's mind is like an ocean. Like the sea, some parts of a person can be shallow and light, while other parts are deep and dark, scary even at times. Beautiful parts and stormy parts. Crowded parts and empty parts. Both almost mimic reality but mock it in a way, which is what Dr. Seuss is saying.
To create this image I first took a picture of my fellow class mate, Kyle, and opened the picture on Photoshop. I then made the background black and cut out his image and made the figure blue. I created a clipping mask to ensure that all the elements I put into the picture would stay behind the black background. Then I took elements from pictures of marine life I took at the aquarium and organized them to look how I wanted. To change the size of the added elements, I used the free transform tool. To select them in the first place, I used the quick selection tool.
To create this image I first took a picture of my fellow class mate, Kyle, and opened the picture on Photoshop. I then made the background black and cut out his image and made the figure blue. I created a clipping mask to ensure that all the elements I put into the picture would stay behind the black background. Then I took elements from pictures of marine life I took at the aquarium and organized them to look how I wanted. To change the size of the added elements, I used the free transform tool. To select them in the first place, I used the quick selection tool.
restored ur childhood
Side lighting
Environmental photos
Effects of butterfly lighting
Successful selfies.
Ok selfies
Silhouettes
Shadows
Making Selections in Photoshop
ABC book
Reflections and juxtaposition
Patterns

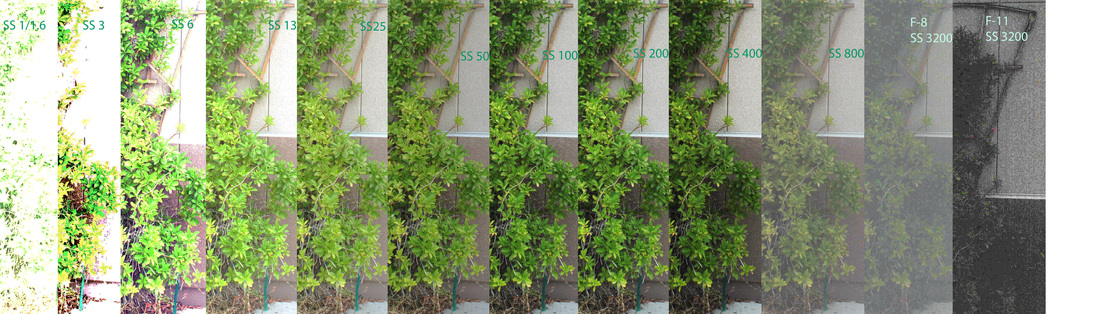
Comparing ISO's

Comparing ISO's
Rule of Thirds
Framing
Stop-action, blurring, and panning (and Hayley being weird)
Depth of field
